ilmek: Build and Inspect Image Processing Pipelines in Your Browser
I built ilmek, a free, open-source lab where you build image processing pipelines from blocks, see every intermediate result, and export the pipeline as Python with OpenCV.

On this page
Most image processing code shows you two things: the input and the final result. When the result is wrong, the steps in between stay hidden, and finding the step that failed means printing arrays, saving test images and running the script again. I built ilmek to make that middle part visible.
In ilmek, you build a pipeline from blocks on a canvas, and every block keeps its own result. Change a setting, and you see what changed, where it started and how far it traveled. When the pipeline does what you want, you can export it as a Python script that uses OpenCV and keep working on it in your own environment.
Try ilmek in your browser (opens in a new tab). It is free and open source, it needs no account, and your images are processed on your own computer.
ilmek is a lab for learning, teaching, experimenting and prototyping. It is not a replacement for OpenCV, scikit-image or a production vision system. It has no deep learning blocks, it runs in a browser tab, and the Python it exports is a starting point for your own code, not a finished application.
Quick start
The quickest way to see how ilmek works is one of its five sample projects. This one detects coins and takes about five minutes.
- Open ilmek.yarpiz.com (opens in a new tab), then choose Help > Sample projects > Detect circles.
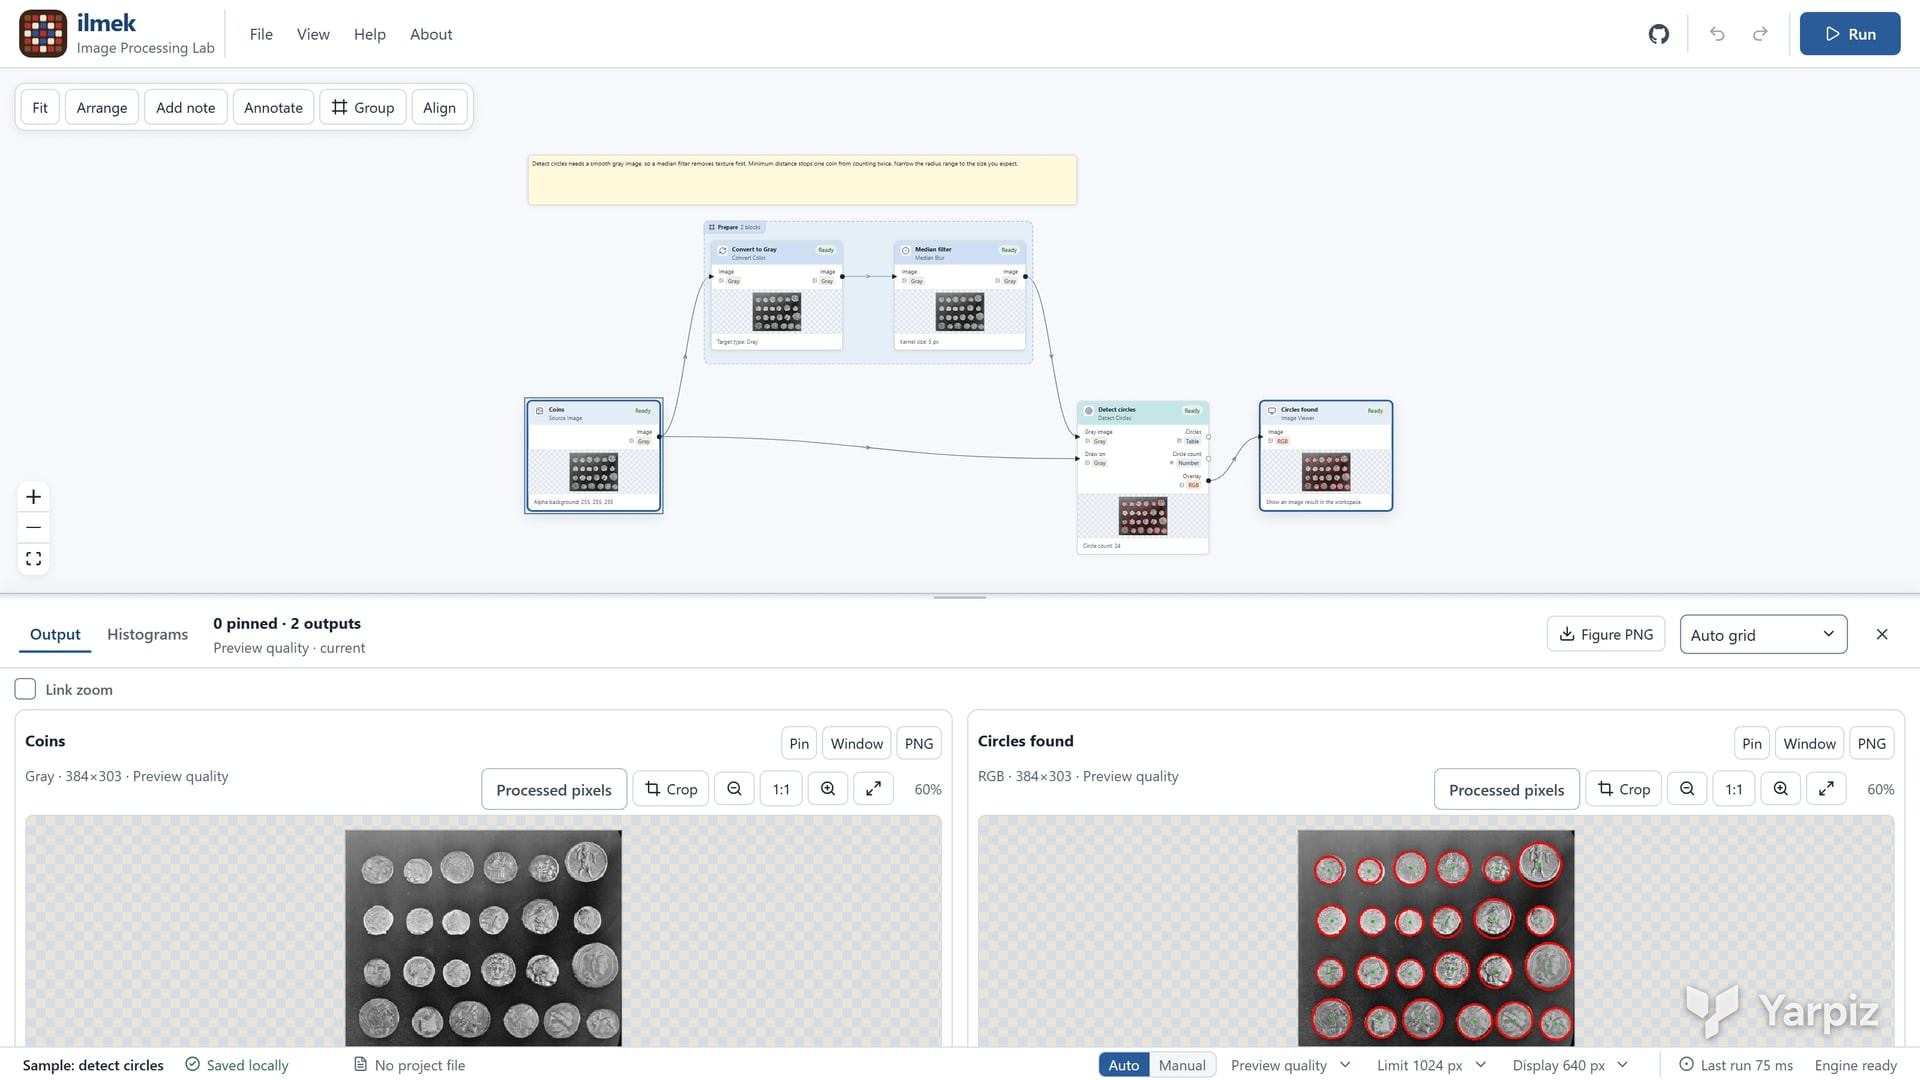
- Look at the canvas. The pipeline reads from left to right: a photo of ancient coins, a median filter that smooths the coin texture, and a Detect Circles block that uses the Hough transform. A viewer draws each circle it finds on the original photo.
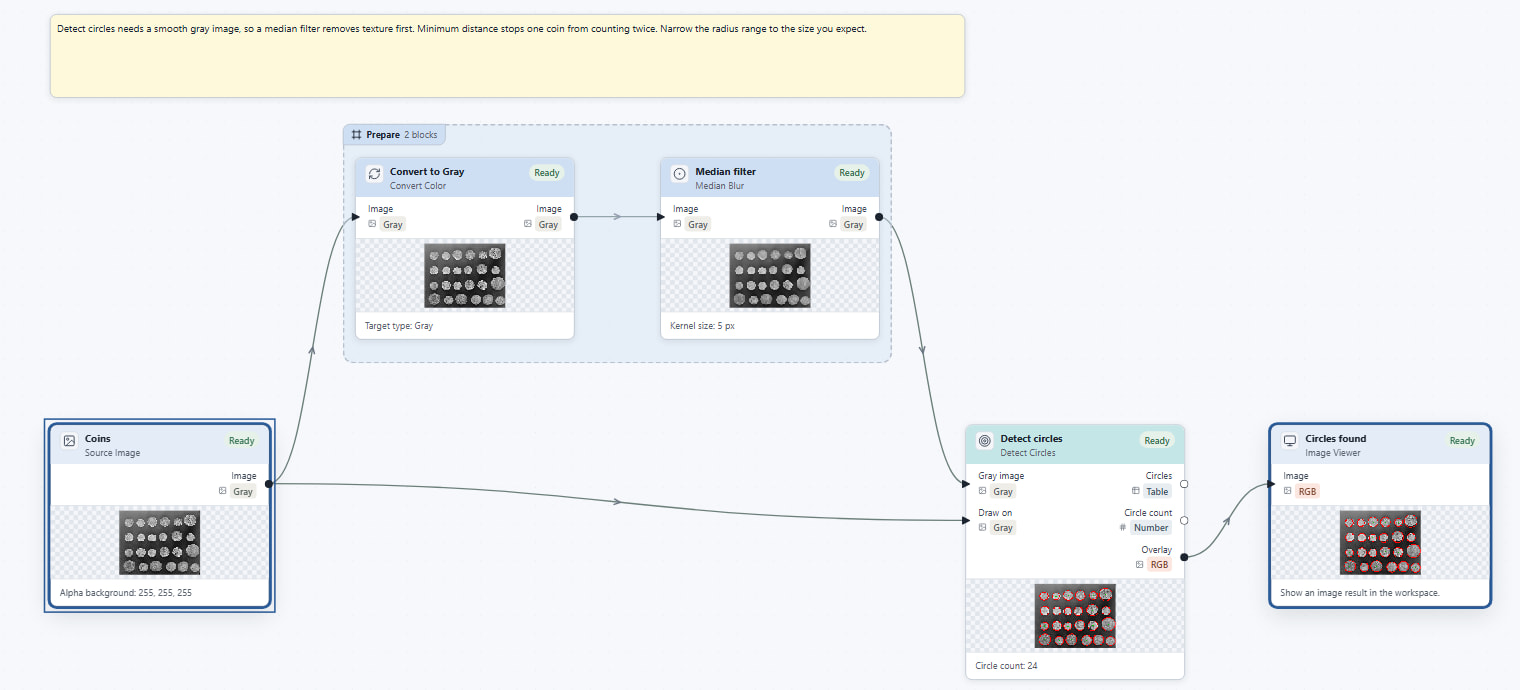
Every block shows a small preview of its own output, so you can follow the image through the pipeline. The Detect circles block reports a count of 24.
- Select the Coins block and the Circles found viewer. Their outputs appear side by side under the canvas, so you can check each detection against the photo.
- Select Detect circles and change one setting in the Properties panel. Raise Minimum radius from 14 to 20, and the count drops to 16, because the smaller coins no longer qualify. Set it back, then lower Votes from 20 to 12. The count rises to 33, and the overlay shows why: the extra circles sit in the gaps between coins.
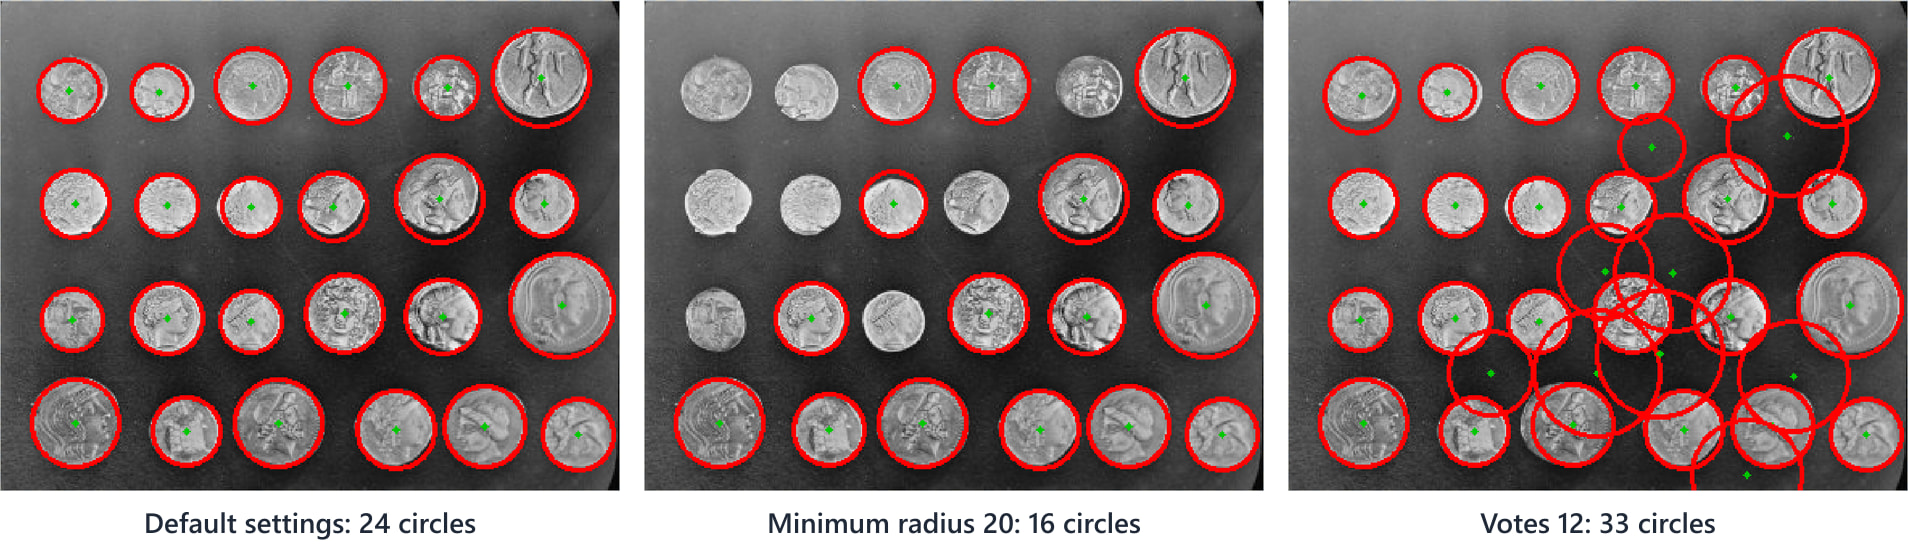
The same pipeline with one setting changed at a time. A higher count is not a better result: at Votes 12, nine of the circles are not coins.
- Try the median filter too. With a kernel size of 3, 5 or 7, the count stays at 24, so on this image the detector is not sensitive to that setting. That is also worth knowing.
- When you are done, choose File > Export Python code to download the pipeline as a Python script (more on that below).
One detail: the coin photo is already grayscale, so the Convert to Gray block changes nothing here. It is there so the pipeline keeps working when you replace the coins with a color photo, because a color image loads as RGB and Detect Circles needs a gray input.
The blocks
The toolbox holds 59 blocks in 15 categories, and you can combine them into many kinds of pipelines. This table groups them by area and names some of them:
| Area | Blocks |
|---|---|
| Sources | Source Image, Generated Source, Editable Drawing |
| Color and intensity | Convert Color, Extract Channel, Gamma, Contrast Stretch, Equalize Histogram |
| Noise and filtering | Add Noise, Gaussian Blur, Median Blur, Bilateral Filter, Sharpen, Custom Linear Filter |
| Frequency | FFT, Frequency Filter, Inverse FFT |
| Edges | Sobel X, Sobel Y, Gradient Magnitude, Laplacian, Canny Edges |
| Thresholds and masks | Otsu Threshold, Adaptive Threshold, HSV Range Threshold, Mask Logic, Apply Mask |
| Morphology | Erode Mask, Dilate Mask, Open Mask, Close Mask, Mask Top-hat, Mask Black-hat |
| Detection and geometry | Detect Lines, Detect Circles, Crop, Resize, Flip |
| Combine and analysis | Blend, Absolute Difference, Histogram, Image Statistics, Find Objects, Bounding Box |
| Outputs | Image Viewer, Image Gallery, Histogram Viewer |
A pipeline can branch, so one image can feed two methods that you compare side by side. Notes and colored groups help you explain a pipeline to someone else.
The Count and measure objects sample shows a typical inspection pipeline. The pipeline smooths the image and separates the coins from the background with an adaptive threshold. The light is uneven, so this threshold compares each pixel with its neighborhood instead of using one global value. A morphological opening then removes specks, and the last group counts and measures the objects.
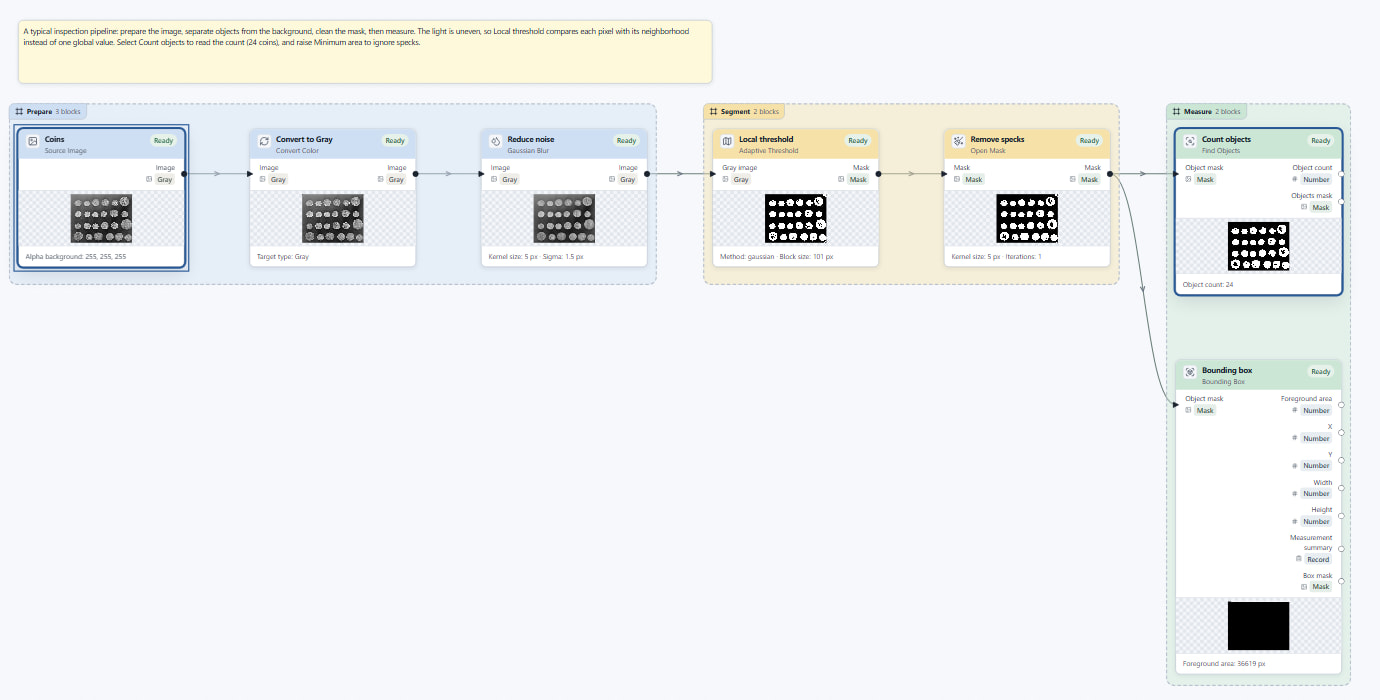
Prepare, segment, measure. Colored groups keep a longer pipeline readable, and the Count objects block reports 24 objects.
The frequency domain is visible too. The Filter in the frequency domain sample shows the spectrum of an image, the spectrum after a low-pass filter, and the blurred image that comes back from the inverse transform.
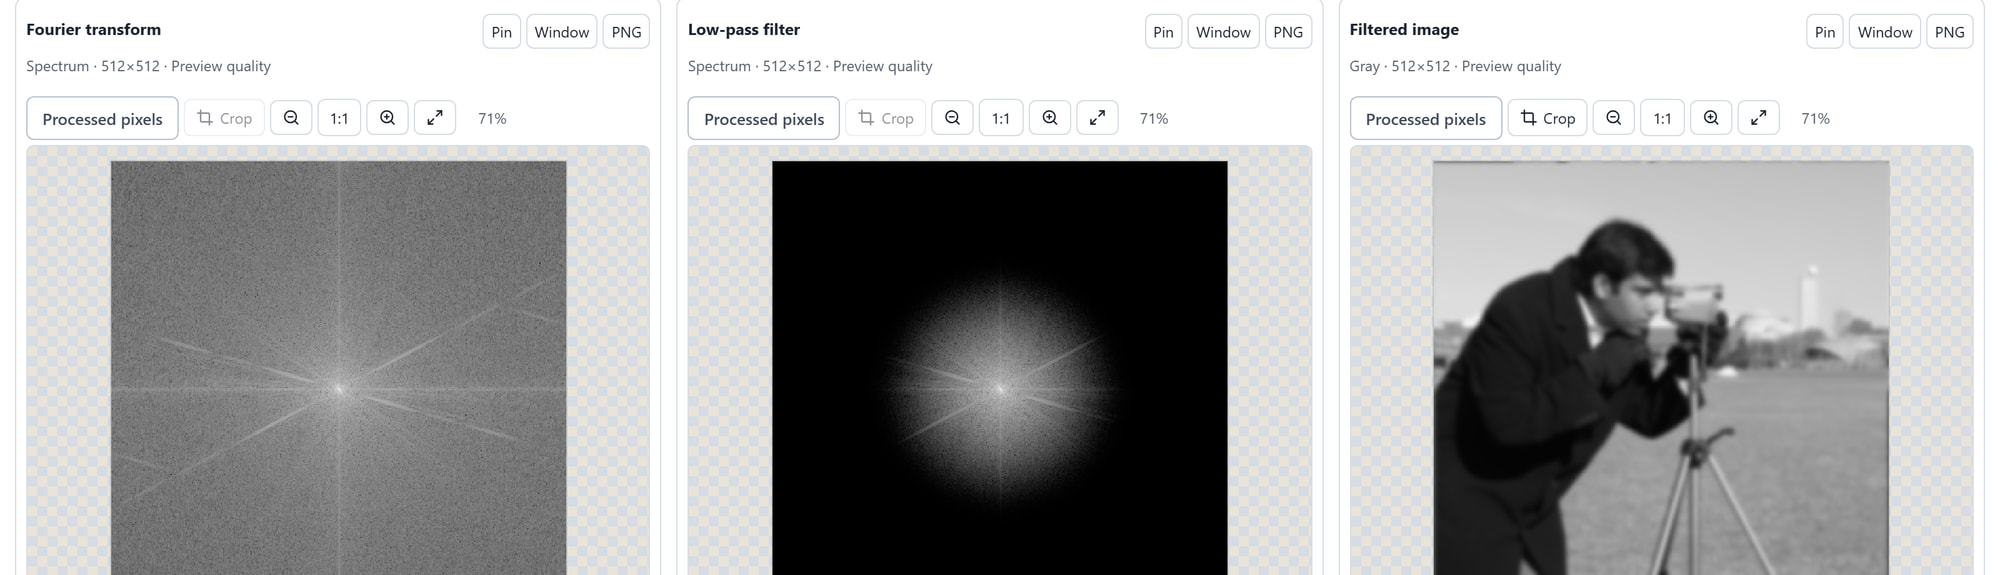
The low-pass filter keeps only the center of the spectrum, where the low frequencies are. The fine detail is gone from the image that comes back.
Your images
A Source Image block takes a file from your computer (PNG, JPEG or WebP, up to 20 MiB), a sample image, a photo from your webcam, or live camera frames at up to 15 frames per second. A Generated Source block makes test patterns, and an Editable Drawing block lets you draw your own input.
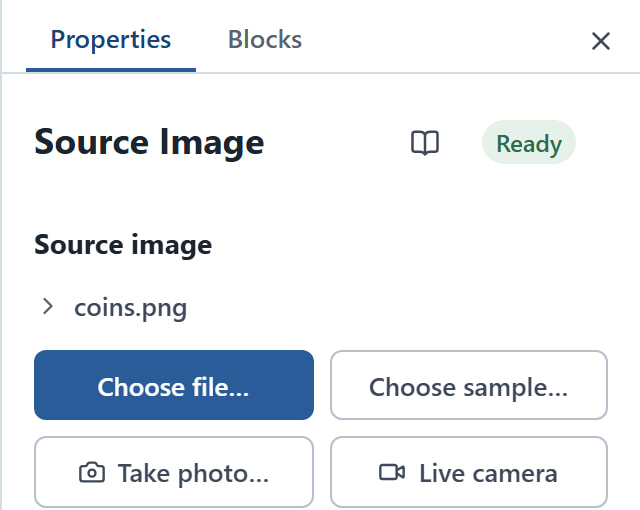
Four ways to fill a source block.
The sample gallery has images chosen for specific lessons: fruit for color ranges, a printed Sudoku page under uneven light for thresholds, a checkerboard for corners and perspective, and classic test images from scikit-image. Each card names the source and the license of the image.
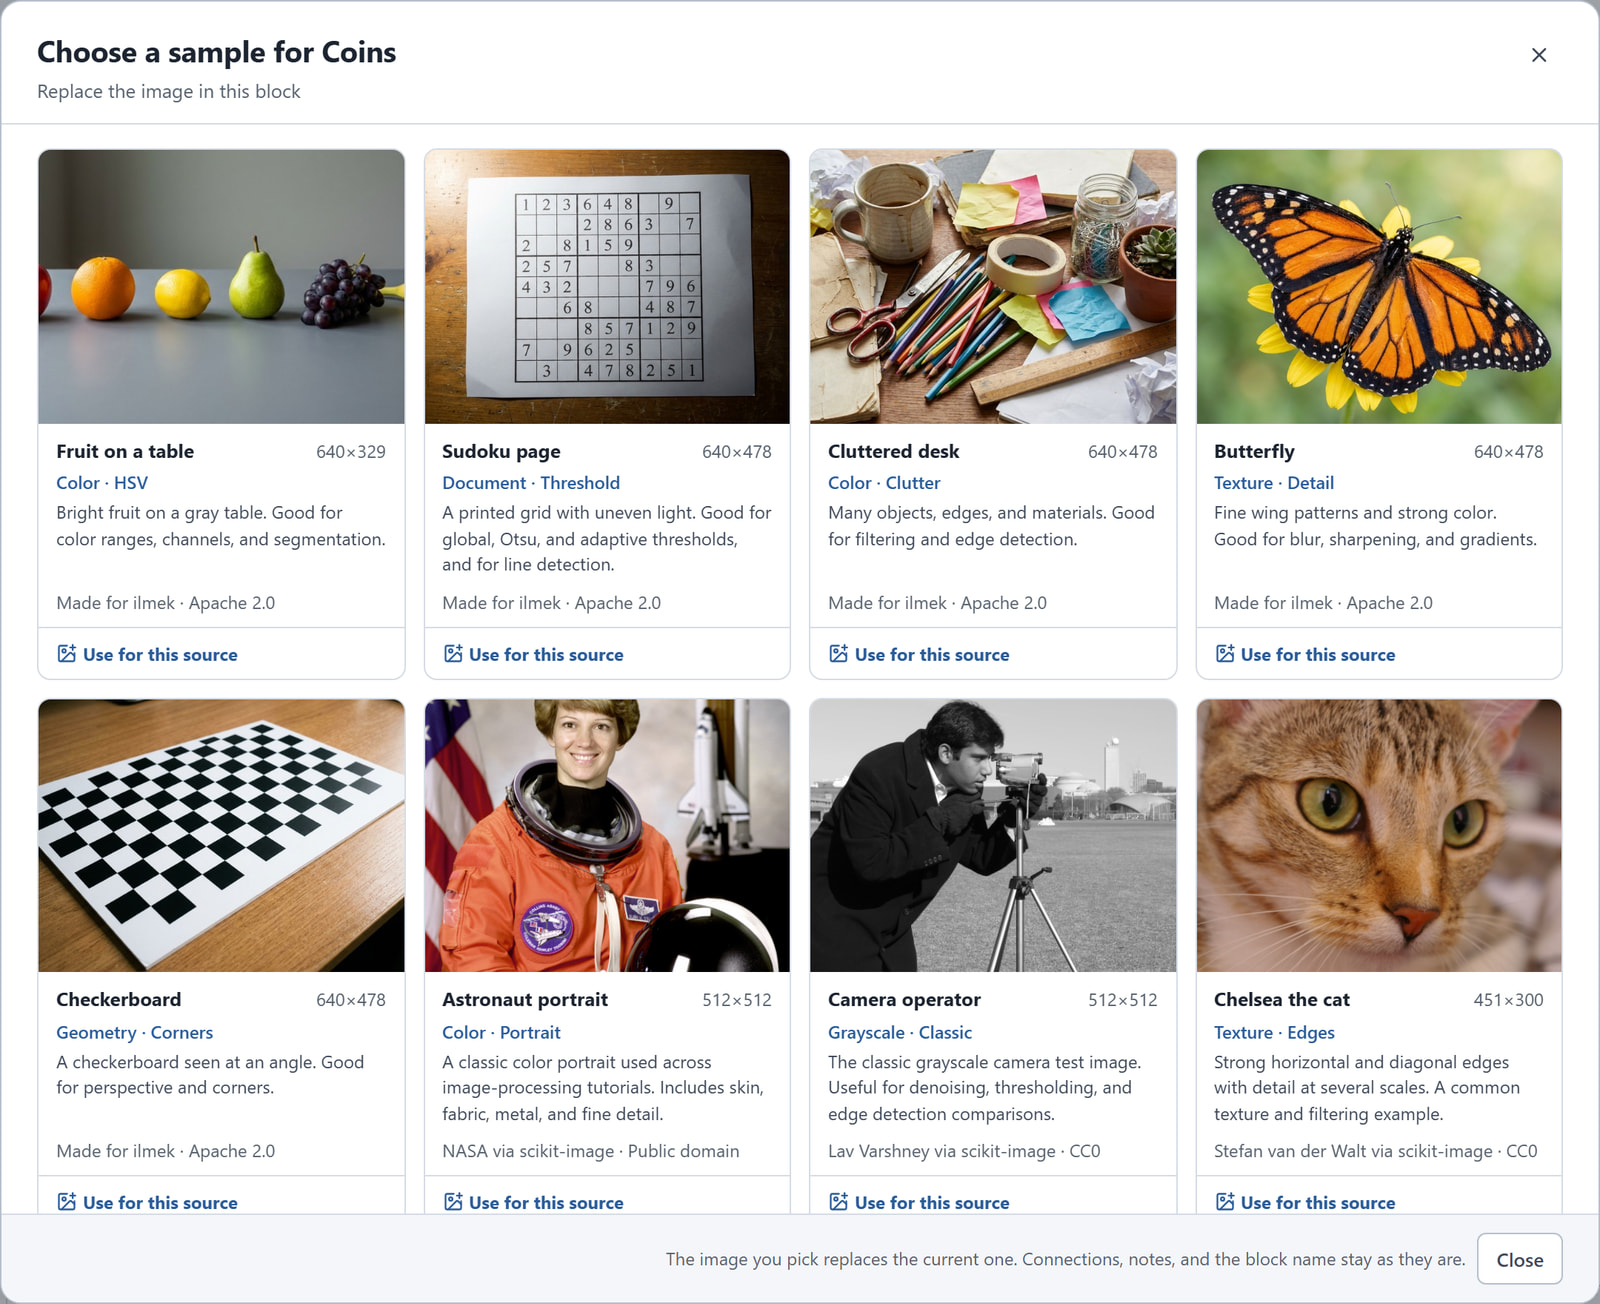
Part of the sample gallery. Each card says which topics the image is good for.
To inspect a result in detail, you can pin it, link the zoom of several viewers, read the value of a single pixel, and export one viewer or the whole figure grid as a PNG. Histograms have their own tab, with a linear or a logarithmic scale and a CSV export.
Guided learning
The guided activities are where ilmek is most useful for learning. Each activity loads a starter pipeline and follows the same four steps:
- Predict what an operation will do, before you touch it.
- Experiment by changing specific settings on the starter pipeline.
- Observe the result, including the histograms and intermediate images.
- Explain what happened, and why your prediction was right or wrong.
Take “Brightness is not contrast”. It asks: does adding 120 raise every pixel by 120, and what happens near 255? The starter pipeline already adds an offset of 60 to a gray ramp, so every value moves up by 60. The values from 196 up would pass 255, but 255 is the largest value an 8-bit pixel can hold. So they all become 255 and pile up in one tall bar at the right edge of the histogram.
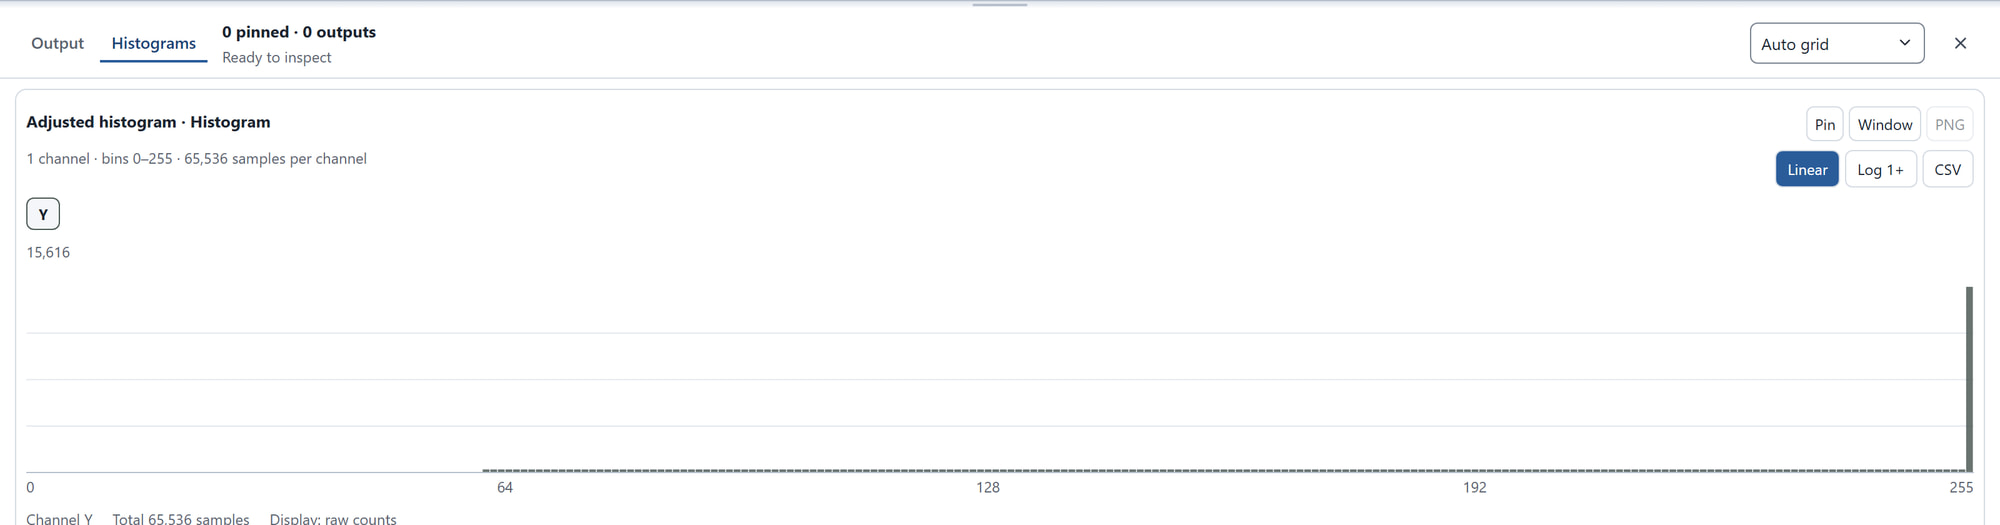
Clipping in a histogram. The tall bar at 255 holds every value that tried to go higher, and their differences are lost.
A student who sees that bar once understands why a brighter image can hold less information. The other activities work the same way:
| Activity | What you learn | Time and level |
|---|---|---|
| Brightness is not contrast | Tell offset, gain, gamma and equalization apart, and spot clipping in a histogram | 12 to 18 minutes, beginning |
| Noise and filter choice | Compare linear and nonlinear noise filters, and match the filter to the kind of noise | 15 to 20 minutes, beginning to intermediate |
| Global versus local threshold | See why uneven lighting defeats a single threshold, and what adaptive methods assume | 15 to 20 minutes, intermediate |
| Morphology and foreground | Link the kernel shape to the result, and explain the order of steps in opening and closing | 15 to 20 minutes, intermediate |
| Color segmentation with HSV | Work with hue, saturation and value, and use a hue range that wraps past 179 to 0 | 15 to 20 minutes, intermediate |
| Edges and processing order | Weigh smoothing against edge detail, and see how block order changes the result | 15 to 20 minutes, intermediate |
An introductory lab comes before them. Each activity also has a teacher note with a concrete suggestion. For the threshold activity, it reads: “Automatic does not mean correct. Treat the selected threshold as evidence, not a guarantee.”
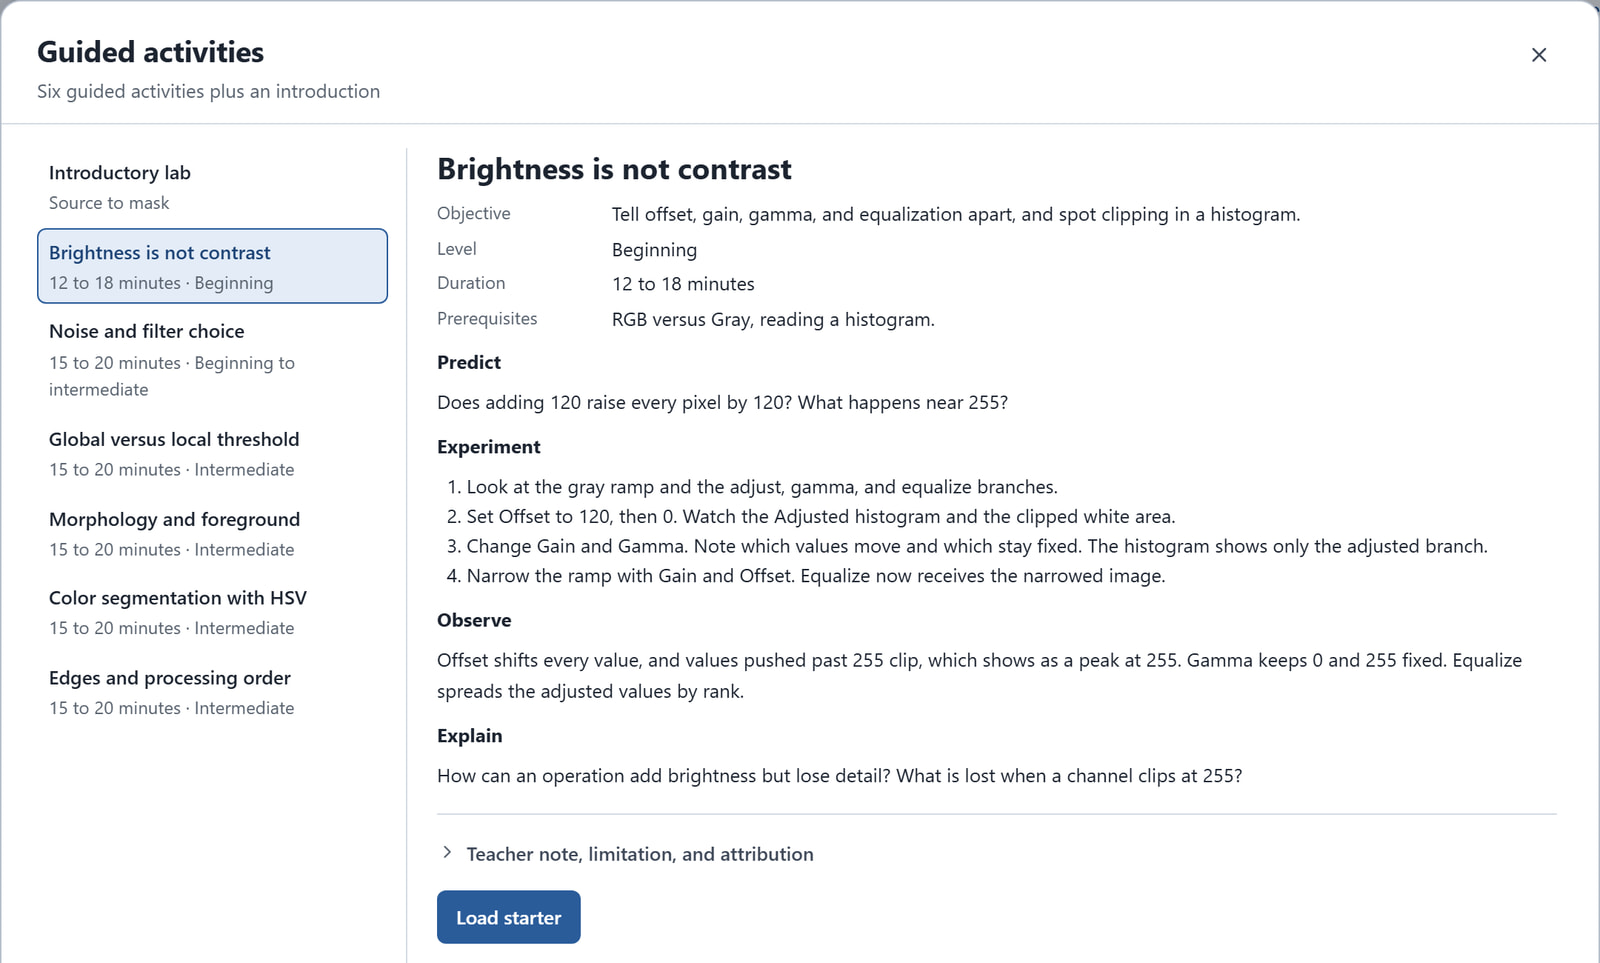
An activity states its objective, level, time and prerequisites before the four steps. Load starter opens the pipeline it uses.
When a result surprises you, the built-in reference explains it. Every block has a page with the theory, the math, each setting, the inputs and outputs, the constraints of the method and a common misconception. The Median Blur page, for example, works through a window of nine pixels to show why two extreme values have no effect on the median.
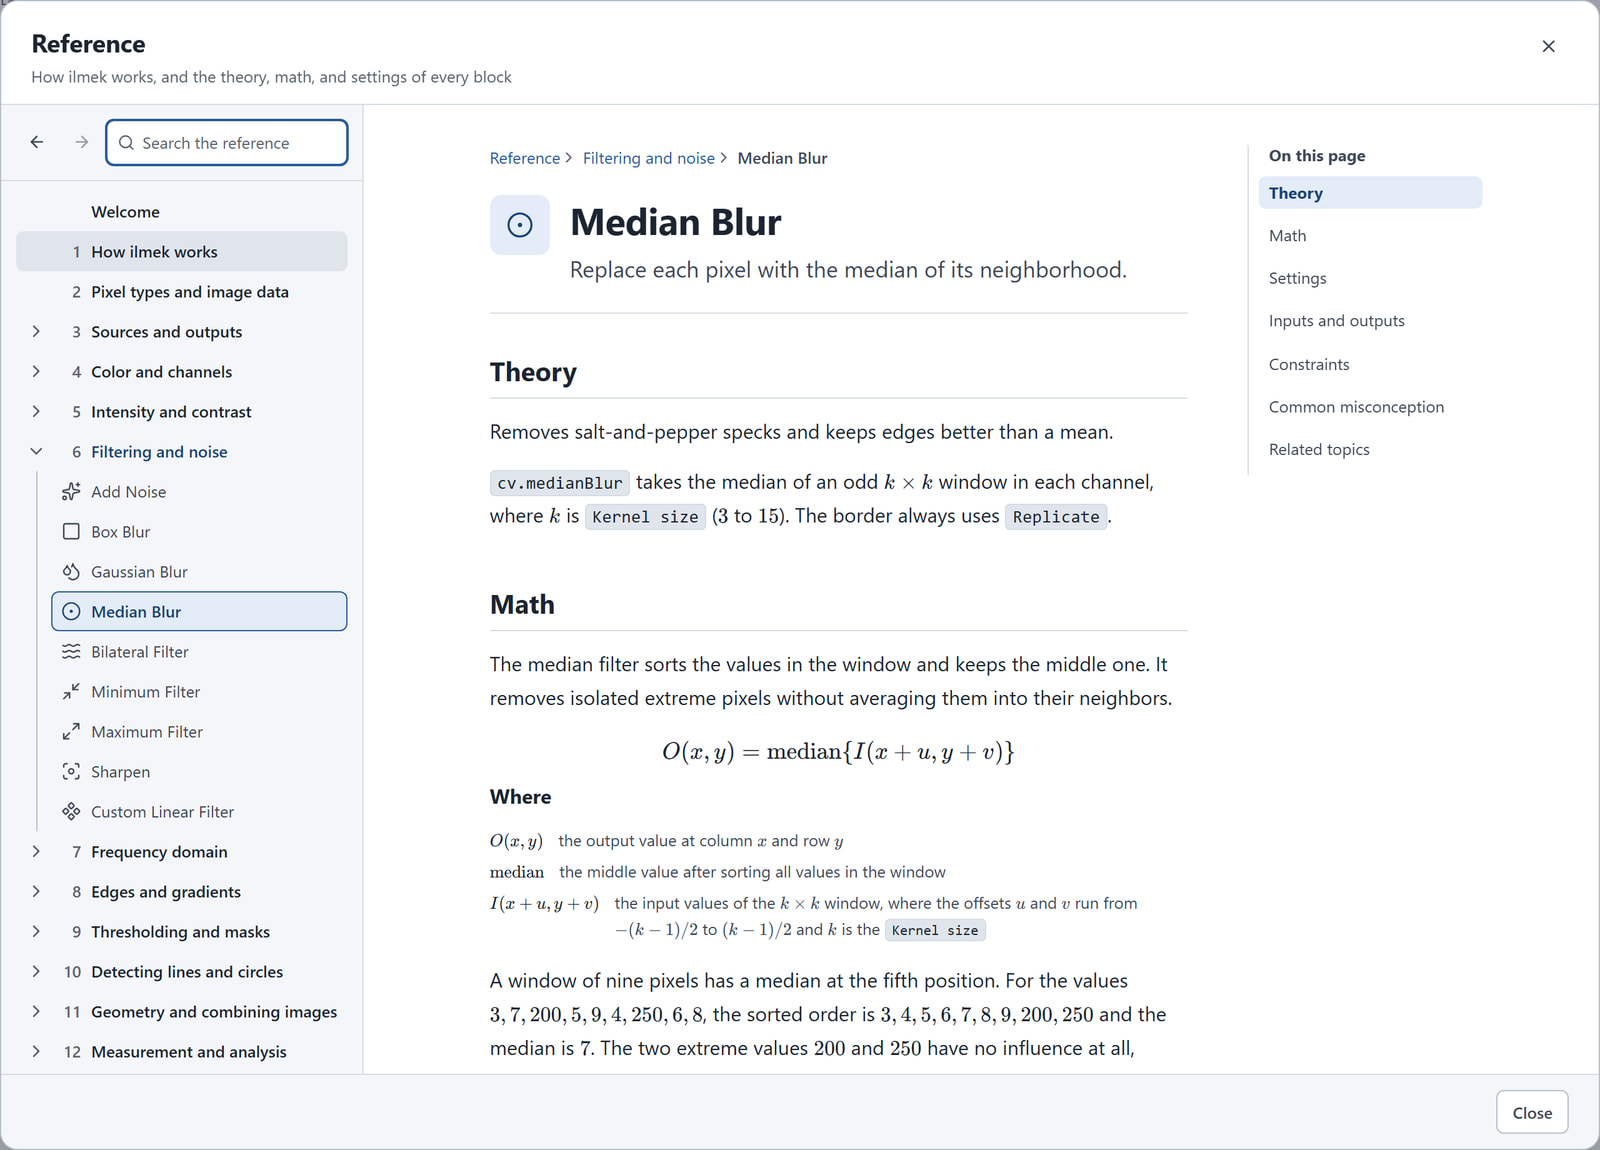
The reference page for Median Blur. The sections on the right show the same structure every block page follows.
Who it is for
- Students can test their own predictions and see the reason behind a result, not only the result.
- Educators can give a class the same starting pipeline as an
.ilmekfile and ask students to compare approaches, with a guided activity and its teacher note as a ready lesson. - Researchers can compare preprocessing choices on sample images, side by side, before they write any code.
- Engineers can prototype an inspection step, such as counting and measuring parts, on representative images, then export it to test in their own environment.
- Developers can read the exported script to see which OpenCV function and parameters each block uses.
- Hobbyists can point a webcam at something and build a pipeline around the live picture.
Python export
When a pipeline works, choose File > Export Python code, pick full or preview resolution, and download the script. You need Python 3.10 or newer with OpenCV, NumPy and Pillow. The script’s header gives the exact install line, which pins the OpenCV version:
python -m pip install opencv-python==4.13.0.92 numpy Pillow
python sample-detect-circles.py --output results
The script is one self-contained file. It embeds the source images and checks them by SHA-256, so it runs without network access. It saves each image result as a NumPy array and, for viewing, a PNG, and it writes measurements and histograms to results.json. The output folder must be empty, so a run never overwrites earlier results.
Each block becomes one call in a run_pipeline() function, with its settings written out. Behind each call is a helper that uses plain OpenCV. For the Detect circles block, the helper’s core is this call, which also shows how the settings map to OpenCV: Votes is param2, and Canny high is param1.
found = cv2.HoughCircles(np.ascontiguousarray(image.data), cv2.HOUGH_GRADIENT, p["dp"], p["minDist"],
                         param1=p["cannyHigh"], param2=p["accumulatorThreshold"],
                         minRadius=int(p["minRadius"]), maxRadius=int(p["maxRadius"]))
When I ran the exported Detect circles script with OpenCV 4.13, it also found 24 circles. Results can still differ slightly from the browser, because image decoding and rounding are not identical, so check the numbers before you rely on exact pixel values.
Treat the export as a starting point, not as production code. The script processes the images embedded in it. To try other images, replace the source in ilmek and export again, or change the source in the script. Batch processing, camera input, error handling and validation on a larger set of images are yours to add.
Good to know
Your work is saved in the browser as you go. To move a project to another computer or share it, save it as an .ilmek file, which includes its source images. You can also save settings as presets for a block, and reuse parts of a pipeline as snippets. ilmek is designed for desktop and laptop screens.
The ilmek website delivers the app to your browser. After that, the image processing runs locally, with OpenCV.js in a Web Worker. Images you open, photos you take and camera frames stay on your computer and are not sent to a server. The only images the app downloads are the samples from its own gallery.
ilmek is released under the Apache License 2.0. That license applies to ilmek, not the MIT license that covers code published on this site. This post describes version 0.1.0, which bundles OpenCV.js 4.13.0. Block counts, activities and the exported OpenCV version may change in later releases.
The name
In Turkish, ilmek is the knot of a rug. Each knot adds one point of color, and together the knots form the pattern. A knot is the pixel of a rug, which is why I chose the name.
Feedback
Open ilmek (opens in a new tab) and start with Detect circles or the guided activity “Brightness is not contrast”.
I would like to hear from you. Some of the most useful things you can share:
- how an activity worked in your class, and what your students found confusing
- a pipeline you built for a real task, as an
.ilmekfile, so others can learn from it - a block, sample image or activity you missed, or a result that looked wrong
Please send these as issues on GitHub (opens in a new tab), where you can also read the source code.
Citing ilmek
If you use ilmek in teaching or research, please cite the software. The citation box below this post cites the article itself.
Kalami Heris, M. (2026). ilmek Image Processing Lab (Version 0.1.0) [Computer software]. Yarpiz. https://github.com/smkalami/ilmek-image-processing-lab (opens in a new tab)
@software{kalami_heris_ilmek_2026,
  author    = {Kalami Heris, Mostapha},
  title     = {ilmek Image Processing Lab},
  version   = {0.1.0},
  year      = {2026},
  publisher = {Yarpiz},
  url       = {https://github.com/smkalami/ilmek-image-processing-lab}
}
Downloads
How to cite
If you use this code or tutorial in your work, articles or publications, please cite it.
Mostapha Kalami Heris, ilmek: Build and Inspect Image Processing Pipelines in Your Browser (YPCV301), Yarpiz, 2026. https://yarpiz.com/ilmek-image-processing-lab-ypcv301@misc{yarpiz-ypcv301,
author = {{Mostapha Kalami Heris}},
title = {{ilmek: Build and Inspect Image Processing Pipelines in Your Browser}},
howpublished = {Yarpiz},
year = {2026},
note = {Code YPCV301},
url = {https://yarpiz.com/ilmek-image-processing-lab-ypcv301}
}Published
Comments